

- Home
- IVD
- By Technology Types
- By Diseases Types
- By Product Types
- Research
- Resource
- Distributors
- Company
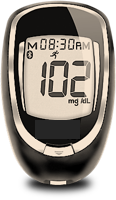
Blood glucose testing works by measuring the electrical current generated when glucose reacts with FAD glucose dehydrogenase on the test strip’s electrode. A sample of blood or control solution is drawn into the tip of the test strip by capillary action. The glucose in the sample reacts with FAD glucose dehydrogenase, producing electrons and thereby generating an electrical current. The blood glucose meter measures this current and calculates the blood glucose level. The blood glucose level is displayed by the meter in mg/dL.
| Control Solution | 1.Wash your hands with soap and water. Be sure to dry your hands before performing a test. 2.Start with the blood glucose meter off. Insert a test strip with the printed side facing up and contact end toward the meter. Push the test strip into the meter Test Strip Port until it stops. 3.Press “<”, the meter will enter into control solution testing mode and display the control symbol. 4.Gently swirl and invert the control solution bottle to mix and remove the cap. DO NOT shake the control solution. 5.Squeeze the bottle and discard the first drop. Wipe the bottle tip with a clean tissue. 6.Squeeze one drop of control solution onto a clean piece of aluminum foil or plastic wrap. 7.With the test strip still in the meter, touch the tip of the test strip to the control solution drop until the meter beeps. Make sure the reaction zone is completely filled. 8.The meter counts down for 5 seconds, then displays the control solution test result with the control symbol. If the meter does not display the control symbol, re-do the test. 9.Check if the test result is in range. Compare the test result with the corresponding level's control range printed on the test strip vial you are using. 10.Press Eject button and eject the test strip into a trash container. Discard the used test strip carefully as medical waste. |
| Blood | 1.Remove a test strip from the test strip vial and immediately tighten the cap. 2.Insert the test strip fully into the meter’s test strip port until it can go no further. 3.When the meter screen displays a flashing blood drop symbol, press the “▼” button to select the test type (pre-meal or post-meal). 4.Make sure the lancing device is firmly pressed against your finger, prick your finger, and allow a blood drop to form. 5.When the blood glucose meter screen displays a flashing blood drop symbol, place a drop of blood on the top of the test strip’s reaction area. Allow the blood to be absorbed into the test strip until the entire reaction area is filled. 6.After a 5-second countdown, the meter will display the test result. 7.Dispose of the used test strip in the trash, taking care to avoid contamination. |
| Test Sample | Fresh apillary whole blood from the finger or forearm, or control solution |
| Result Range | 40-600 mg/dL |
| Sample Size | 1 μL |
| Test Time | 5 seconds |
| Result Value | Plasma equivalent values |
| Assay Method | Electrochemical |
| Power Supply | 2 AAA alkaline batteries |
| Battery Life | Approximately 1,000 tests |
| Automatic Shut-off | Result displayed for 1 minute if test strip remains in meter; meter turns off immediately if test strip is removed |
| Weight | 1.89 ounces |
| Size | 3.65” x 2.11” x 0.89” |
| Memory Size | 500 blood glucose test results and 100 control solution test results |
|
There is no product in your cart. |
Copyright © 2026 Alta DiagnoTech. All rights reserved.